How to Setup OpenClaw: A Complete Guide to Running AI Agents Locally
TL;DR: OpenClaw is an open-source AI agent platform that runs locally and integrates with chat apps like WhatsApp and Telegram. It requires Node.js version 22 or higher and works on macOS, Linux, or Windows (preferably via WSL2)
-
Onboarding and Configuration: The setup includes a comprehensive onboarding wizard (
openclaw onboard) to configure essential API keys (like OpenAI or Anthropic), communication channels such as WhatsApp and Telegram, and background daemon services. -
Management and Maintenance: Once installed, users can verify system health via the
openclaw doctorcommand and manage their agents through a local web dashboard accessible athttp://127.0.0.1:18789/.

Intro
If you are looking to run autonomous AI agents that integrate directly with chat applications like WhatsApp and Telegram, OpenClaw is a powerful open-source solution. It is designed to run locally, giving you control over your data while leveraging powerful models.
This guide covers exactly how to setup OpenClaw on macOS, Linux, and Windows, ensuring you can get your agent running in minutes.
Prerequisites
Before running the installation script, ensure your environment meets the following requirements:
- Node.js: You must have Node.js version 22 or higher installed.
- Operating System: OpenClaw supports macOS, Linux, and Windows (via WSL2).
- API Keys: Have your API keys ready for the LLM provider you intend to use (e.g., OpenAI or Anthropic).
Step 1: Install OpenClaw via CLI
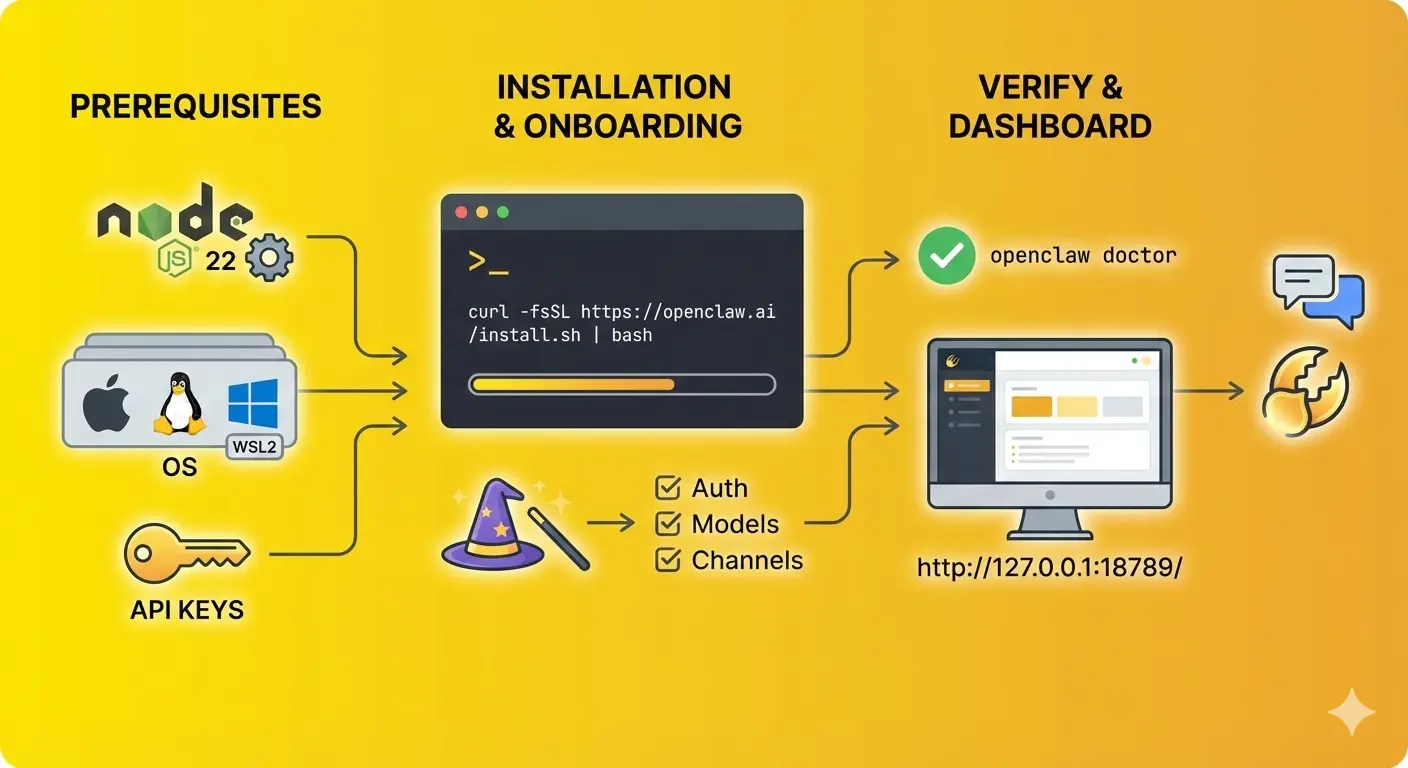 The developers provide an automated script that detects your operating system and handles the global npm installation for you.
To start the installation, open your terminal (or PowerShell on Windows) and run the following command:
Bash
curl -fsSL https://openclaw.ai/install.sh | bash
This script will install the software via npm globally and automatically prompt you to begin the onboarding process once the download is complete.
Step 2: Platform-Specific Configurations
Depending on your operating system, you may need to take specific steps to ensure a smooth installation.
For Windows Users (WSL2)
Native Windows installation is currently untested. It is highly recommended to install OpenClaw inside a WSL2 (Windows Subsystem for Linux) environment running Ubuntu.
- Ensure you are using WSL2. You can upgrade your version using the command: ```
Bash
wsl --set-version Ubuntu 2
- Run the installation command provided in Step 1 inside your WSL terminal.
For macOS and Linux Users
If you encounter errors related to the sharp image processing library during installation, you can bypass the standard installer and use the following command with a specific flag:
Bash
npm install -g openclaw@latest
Step 3: Run the Onboarding Wizard
Once installed, you need to configure your agent's "brain" and communication channels. OpenClaw includes an onboarding wizard that sets up authentication, connects your AI models, and installs the necessary background services (daemon).
Run the following command to start the wizard:
Bash
openclaw onboard --install-daemon
During this process, you will configure:
- Authentication: Set up OAuth or input your API keys (Anthropic/OpenAI).
- Channels: Connect the agent to chat apps like WhatsApp or Telegram.
Step 4: Verify Installation and Access Dashboard
After onboarding, verify that your agent is running correctly by checking its health status:
Bash
openclaw doctor
 OR
openclaw status
If the status checks out, you can access the visual dashboard to manage your agent. You can open it via the command line or your browser:
- Command:
openclaw dashboard - Browser URL: http://127.0.0.1:18789/
Troubleshooting Common Issues
If you run into issues during the setup of OpenClaw, check these common fixes:
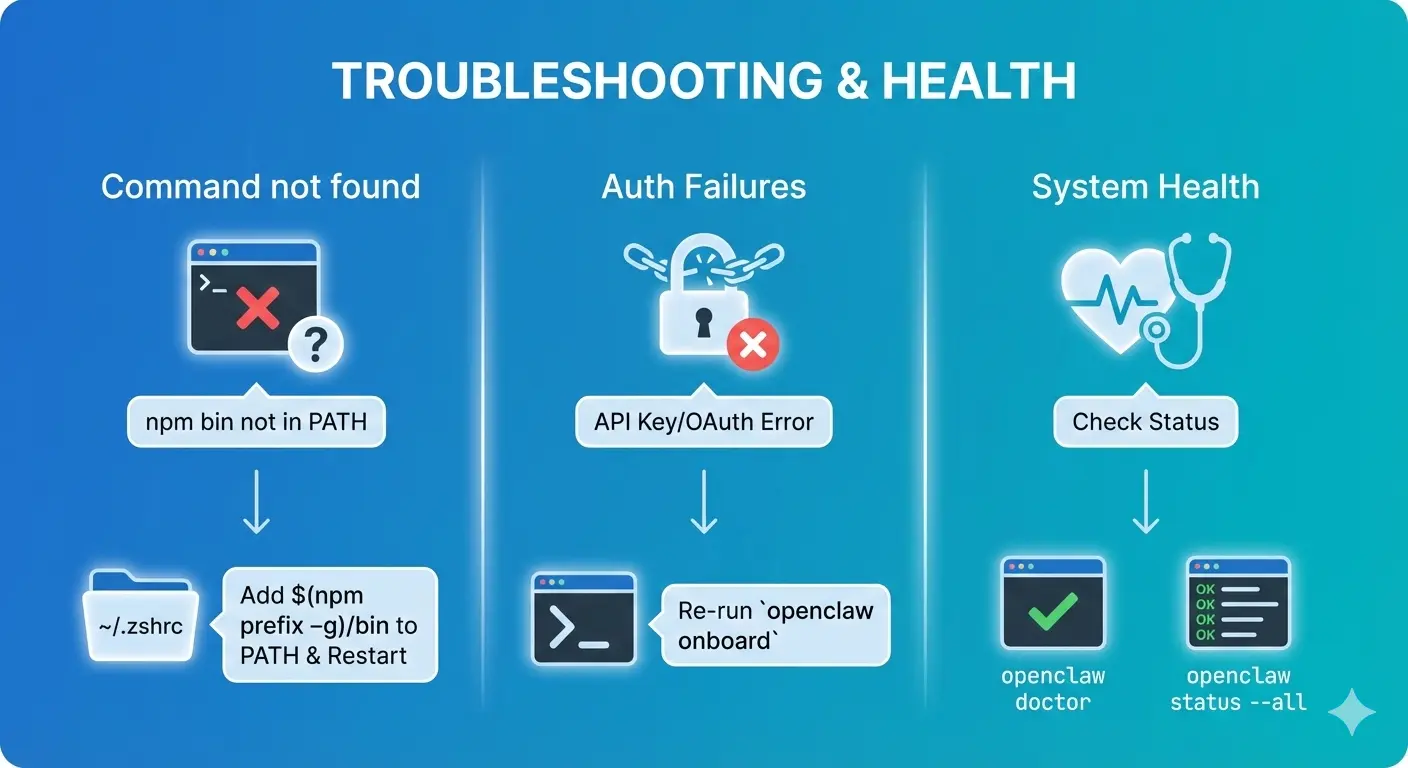
- "Command not found": If your terminal cannot find the openclaw command after installation, you likely need to add the npm bin directory to your PATH. Add
$(npm prefix -g)/bin to your ~/.zshrc(or equivalent shell configuration) and restart your terminal. - Authentication Failures: If your agent cannot connect, try re-running the onboarding command to re-enter your API keys or OAuth credentials.
- Health Check: To get a detailed report on system health, run openclaw health or
openclaw status --all.
Need help setting up OpenClaw? Get your free AI consultation and let Superconscious do it for you
Resources:
- https://www.codecademy.com/article/open-claw-tutorial-installation-to-first-chat-setup
- https://docs.openclaw.ai/start/getting-started
- https://macaron.im/blog/install-openclaw
- https://github.com/pjasicek/OpenClaw
- https://github.com/rsn8887/OpenClaw/actions
- https://www.hostinger.com/tutorials/how-to-set-up-openclaw
- https://www.trendingtopics.eu/openclaw-2-million-visitors-in-a-week/
- https://github.com/clawdbot/clawdbot
- https://en.wikipedia.org/wiki/OpenClaw
- https://docs.openclaw.ai/install/index
Frequently Asked Questions
1. Is OpenClaw free to use?
Yes, OpenClaw is a free, open-source platform. However, while the software itself is free, you will still be responsible for the costs associated with the AI models you connect (such as OpenAI or Anthropic API usage) and any hosting fees if you choose to run it on a cloud server instead of your local machine.
2. Why should I use WSL2 instead of native Windows?
Native Windows support is currently experimental and untested. OpenClaw relies on specific Unix-based terminal behaviors and dependencies (like the sharp image library) that perform most reliably in a Linux environment. Using WSL2 (Ubuntu) provides the necessary compatibility to ensure the agent runs without crashing.
3. What should I do if the "openclaw" command isn't recognized after installation?
This is a common issue where the npm global directory isn't in your system's PATH. You can fix this by adding $(npm prefix -g)/bin to your shell configuration file (like ~/.zshrc or ~/.bashrc). Once added, restart your terminal or run source ~/.zshrc to apply the changes.
Published by Superconscious AI Agency on 2026-01-31. For more AI insights, follow our AI Strategy Blog.